shop vac owner’s manual

Shop Vac Owners Manual: A Comprehensive Guide (Updated 2026)
This manual, derived from a 2005 publication, provides essential guidance for Shop Vac wet/dry vacuum owners, ensuring safe and effective operation.
Shop Vacs, originating with the Shop Vac brand, are versatile wet/dry vacuums designed for diverse cleaning tasks. These robust machines efficiently handle both liquid spills and dry debris, making them invaluable for workshops, garages, and homes.
Originally documented in a 2005 manual, the core functionality remains consistent, though models have evolved. Understanding your Shop Vac’s capabilities – from basic vacuuming to specialized applications – is key. This guide, updated for 2026, will navigate you through operation, maintenance, and safety, ensuring optimal performance and longevity of your cleaning companion.

Understanding Your Shop Vac Model
Shop Vac models vary in capacity, horsepower, and features. Refer to the model number – typically found on the unit’s housing – to identify specific details. The 2005 publication highlights a range of options, but newer models may include enhanced filtration or specialized attachments.
Familiarize yourself with your Shop Vac’s unique specifications. Knowing the tank capacity, airflow (CFM), and water lift (inches) will help you select appropriate accessories and tackle cleaning challenges effectively. This guide provides general information, but always prioritize your model’s specific instructions.
Safety Precautions
Prioritize safety when operating your Shop Vac. Always disconnect the power supply before performing maintenance or changing accessories. Never vacuum flammable liquids or explosive materials; this poses a serious fire hazard. Ensure the collection tank is securely fastened before use to prevent spills.
Avoid vacuuming sharp objects that could damage the hose or tank. Wear appropriate eye protection to shield against debris. This manual, based on a 2005 publication, emphasizes these core safety principles for all Shop Vac users.
General Safety Rules
Always maintain a clean and organized workspace around the Shop Vac to prevent tripping hazards. Keep children and pets away from the operating unit. Never leave the vacuum unattended while it’s plugged in. Inspect the power cord regularly for damage, and replace if necessary.
This guidance, stemming from a 2005 manual, stresses responsible operation. Do not modify the Shop Vac in any way. Use only manufacturer-approved accessories. Proper awareness and adherence to these rules ensure safe and efficient cleaning.

Electrical Safety
Always ensure the Shop Vac is properly grounded to prevent electric shock. Never use the vacuum with a damaged power cord or plug. Avoid operating in wet or damp locations. Disconnect the vacuum from the power outlet before performing any maintenance or filter changes.
Based on a 2005 manual, electrical safety is paramount. Do not yank the cord; grasp the plug to disconnect. Extension cords, if used, must be heavy-duty and rated for outdoor use. Ignoring these precautions could lead to serious injury.
Parts Identification
Understanding your Shop Vac’s components is crucial for proper use and maintenance. Key parts include the vacuum body, hose, wand, and various filters. The 2005 manual details these elements, highlighting their functions.
Familiarize yourself with the motor housing, tank, and latching mechanisms. The hose and wand assembly allows for versatile cleaning. Different filter types – cartridge, foam sleeve – cater to wet or dry debris. Proper identification ensures correct assembly and optimal performance.
Vacuum Body Components
The Shop Vac’s body houses the core operational elements. This includes the robust motor, providing suction power, and the collection tank, designed for both wet and dry materials. A secure latching system ensures the tank remains sealed during operation.
Inspect the caster wheels for smooth movement and the handle for comfortable portability. The power switch controls the vacuum, while the port accommodates hose and accessory connections. Understanding these components aids in troubleshooting and maintenance, as outlined in the 2005 manual.
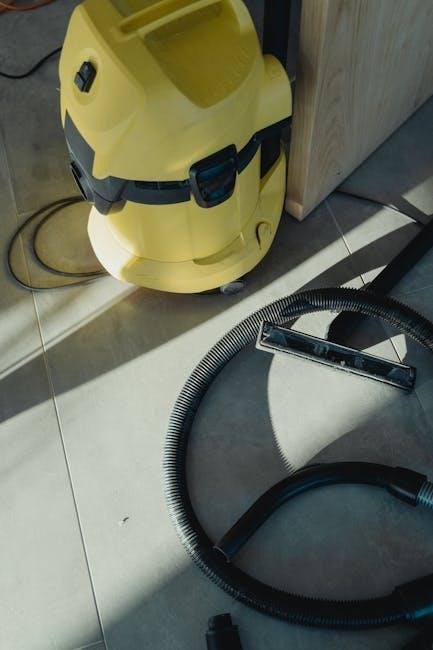
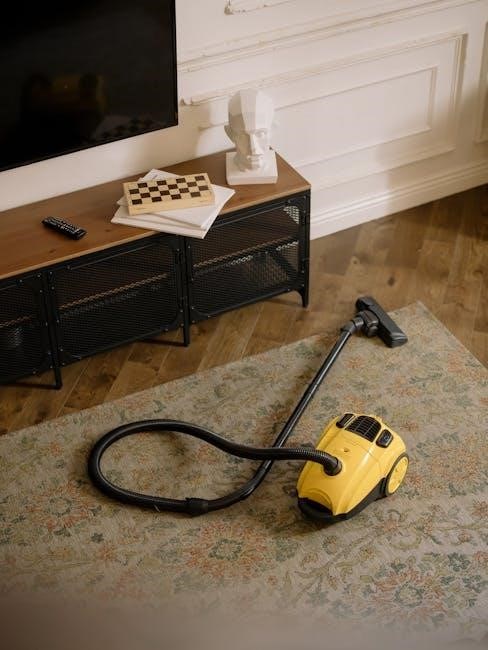
Hose and Wand Assembly
The Shop Vac hose facilitates debris transfer from the cleaning site to the collection tank. Ensure a secure connection between the hose and the vacuum body’s port to maintain optimal suction. The wand extends reach for cleaning tight spaces and elevated surfaces.
Inspect the hose for cracks or blockages regularly. Different attachments can connect to the wand, expanding cleaning versatility. Proper assembly, as detailed in the original 2005 manual, is crucial for efficient performance and preventing suction loss.
Filter Types and Placement

Shop Vacs utilize various filters to handle wet and dry debris effectively. These include standard cartridge filters for dry pickup and foam sleeves for wet applications – never use a dry filter when collecting liquids! Proper filter placement, as outlined in the 2005 manual, is vital for motor protection.
Filters reside within the collection tank, preventing dust and particles from reaching the motor. Regularly check filter condition and replace when visibly dirty or damaged to maintain suction power and vacuum longevity.
Setting Up Your Shop Vac
Before operation, ensure your Shop Vac is correctly assembled. Refer to the 2005 manual for detailed diagrams. Begin by securely attaching the collection tank to the vacuum body, verifying a tight seal. Next, connect the hose to the designated inlet port, ensuring a firm connection to prevent suction loss.
Proper setup is crucial for optimal performance and safety. Double-check all connections before powering on the unit, and always use the appropriate filter for the intended task.
Assembling the Unit

Initial assembly, as detailed in the 2005 Shop Vac manual, involves connecting the tank to the motor head. Ensure proper alignment of the locking mechanisms for a secure fit. Next, attach the caster wheels to the base of the tank, providing mobility.
Confirm all components are firmly in place before proceeding. A loose connection can compromise suction and potentially cause damage. Refer to the diagrams within the manual for visual guidance during this process.
Attaching Accessories
The 2005 Shop Vac manual illustrates various accessory attachments for diverse cleaning tasks. Connect the hose securely to the vacuum body’s intake port, ensuring a tight seal to maximize suction. Different nozzles – crevice tools, floor brushes, and extension wands – then attach to the hose’s end.
Select the appropriate nozzle based on the surface being cleaned. A firm click usually indicates a secure connection. Regularly inspect attachments for wear and tear, replacing them as needed for optimal performance.
Operating Instructions
Before operation, confirm the Shop Vac is correctly assembled and the filter is properly installed, as detailed in the 2005 manual. Power on the vacuum using the switch, and select the desired suction level if adjustable.

Always ensure the collection tank is securely fastened. For optimal performance, avoid overfilling the tank. Regularly monitor the motor’s temperature during extended use, and consult the troubleshooting section if issues arise.
Wet Pickup Procedures
When engaging in wet pickup, ensure the foam sleeve filter is securely in place – a crucial step outlined in the 2005 Shop Vac manual. Never operate the vacuum without this filter when collecting liquids, as it prevents motor damage.
Avoid picking up flammable liquids. Regularly empty the tank during wet pickup to prevent overflow and maintain suction power. Always disconnect the power before emptying or cleaning the tank after wet use.
Dry Pickup Procedures
For dry pickup, utilize a standard cartridge filter, as referenced in the original 2005 Shop Vac documentation. Ensure the filter is clean and properly seated to maximize airflow and suction efficiency.
Avoid picking up extremely fine dust without a HEPA filter to prevent motor clogging and filter damage. Regularly empty the collection tank when it becomes full to maintain optimal performance. Always disconnect power before filter maintenance or tank emptying.
Filter Maintenance and Replacement
Maintaining your Shop Vac’s filter is crucial for performance, as noted in the 2005 manual. Regular cleaning extends filter life and prevents motor strain. Inspect filters before each use for tears or damage.
Cleaning involves gently tapping or rinsing (if applicable – check filter type). Replacement frequency depends on usage; heavy use requires more frequent changes. Utilize appropriate filter types for wet or dry pickup to avoid damage and ensure optimal suction.

Cleaning Filters
Regular filter cleaning, as detailed in the original 2005 Shop Vac manual, is essential for maintaining suction power. For dry debris, gently tap the filter against a solid surface to dislodge dust and particles. Avoid using water on paper filters, as this will damage them.

Some filters are washable; rinse thoroughly with cool water and allow to air dry completely before reinstalling. Never operate the Shop Vac with a wet filter unless it’s specifically designed for wet pickup.
Replacing Filters – Frequency & Types
Filter replacement frequency depends on usage, as outlined in the 2005 Shop Vac documentation. Paper filters should be replaced when visibly dirty or if suction diminishes significantly. Foam sleeves and cartridges have a longer lifespan but require periodic inspection for tears or damage.
Shop Vacs utilize various filter types – dry filters, wet filters, and specialized filters for fine dust. Always consult your model’s accessory guide to ensure compatibility when replacing filters.
Troubleshooting Common Issues
Encountering problems with your Shop Vac? This section addresses frequent concerns. Reduced suction often indicates a full tank, clogged hose, or a dirty filter – check these first. If the motor overheats, immediately turn off and unplug the unit, allowing it to cool completely.
Refer to the 2005 manual’s guidance for further diagnostics. Persistent issues may require professional servicing to ensure continued safe operation of your vacuum.
Loss of Suction
Experiencing a noticeable decrease in suction power? Several factors could be at play. First, ensure the collection tank isn’t full, as this is a common cause. Next, thoroughly inspect the hose and wand for any blockages – debris can easily accumulate.
Finally, and crucially, check the filter. A clogged or dirty filter significantly restricts airflow. Refer to the 2005 manual for cleaning or replacement instructions to restore optimal performance.
Motor Overheating
If your Shop Vac motor is overheating, immediately turn off and unplug the unit. Continuous operation under heavy loads, like picking up large amounts of liquid, can cause this. Allow the motor to cool completely – typically 30-60 minutes – before attempting to restart.
Also, verify the filter is clean, as restricted airflow contributes to overheating. Refer to the original 2005 manual for detailed troubleshooting and preventative maintenance steps.
Storage and Winterizing
Proper storage extends your Shop Vac’s lifespan. Before long-term storage, thoroughly empty the tank, ensuring all debris and liquids are removed. Clean the filter as outlined in the maintenance section, allowing it to dry completely to prevent mildew.
Store the unit in a dry location, protected from freezing temperatures. Following these steps, adapted from the 2005 manual, will prepare your Shop Vac for seasonal use or extended downtime.
Accessory Guide
Enhance your Shop Vac’s versatility with available accessories. Specialized nozzles, referenced in the 2005 publication, allow for targeted cleaning in tight spaces or on delicate surfaces. These attachments maximize suction and efficiency for various tasks.
The blower function, a standard feature, converts the vacuum into a powerful air blower for clearing debris. Explore the range of compatible accessories to tailor your Shop Vac to specific cleaning needs, improving overall performance.
Specialized Nozzles
Shop Vac offers a variety of specialized nozzles to tackle diverse cleaning challenges. Crevice tools reach into narrow gaps, while brush attachments gently loosen dirt from upholstery and delicate surfaces. Floor nozzles efficiently clean hard floors, and wide nozzles cover larger areas quickly.
These attachments, mentioned in the 2005 manual, maximize suction and protect surfaces. Selecting the correct nozzle ensures optimal cleaning performance and prevents damage, extending the life of your Shop Vac and cleaned items.
Blower Function Usage
Many Shop Vac models incorporate a blower function, converting the vacuum into a powerful air mover. To activate, detach the hose and redirect it to the blower port, typically located on the vacuum’s exhaust.
This feature, present in models from 2005 onwards, is ideal for inflating air mattresses, clearing leaves, or drying surfaces. Always ensure the area is well-ventilated and avoid directing airflow towards people or sensitive electronics.
Warranty Information
Your Shop Vac is protected by a manufacturer’s warranty against defects in materials and workmanship. The duration of coverage varies by model, but generally extends from the date of original purchase.
Please retain your proof of purchase for warranty claims. This warranty does not cover damage resulting from misuse, abuse, or unauthorized repairs. Contact customer support (see section below) for specific warranty details pertaining to your Shop Vac model and registration information.
Contacting Customer Support
For assistance with your Shop Vac, or to submit warranty claims, our dedicated customer support team is readily available. You can reach us via phone at 1-800-SHOP-VAC (1-800-746-7822) during business hours, Monday through Friday, 8 AM to 5 PM EST;
Alternatively, visit our website at [insert website address here] for FAQs, troubleshooting guides, and online support submission. We are committed to providing prompt and helpful assistance to ensure your complete satisfaction with your Shop Vac product.